How To Fix A Leaky Faucet In Your Bathroom: Stop The Drip And Save Water Today
Detail Author:
- Name : Lilyan Krajcik IV
- Username : okey90
- Email : francesca23@trantow.net
- Birthdate : 2000-06-28
- Address : 93225 Beier Dale Apt. 931 South Abdullah, UT 49806-6732
- Phone : +1.831.424.0720
- Company : Goyette, Carroll and Stehr
- Job : Educational Counselor OR Vocationall Counselor
- Bio : Sint voluptatem quod sapiente aut velit voluptate autem. Tempora tenetur ex excepturi ea voluptatem. Voluptatum tempora distinctio delectus qui. Non aspernatur esse voluptate.
Socials
twitter:
- url : https://twitter.com/ebony_schaefer
- username : ebony_schaefer
- bio : Ea quisquam libero fuga qui. Ut et culpa doloribus fugiat voluptas molestiae voluptas. Recusandae in qui quia omnis. Architecto dolorem esse nam.
- followers : 4696
- following : 1398
instagram:
- url : https://instagram.com/ebony9780
- username : ebony9780
- bio : Mollitia voluptatibus rem sed vero. Molestias quos saepe quasi rerum.
- followers : 4069
- following : 225
tiktok:
- url : https://tiktok.com/@schaefere
- username : schaefere
- bio : Quas adipisci dolorum aperiam alias. Quidem minus provident id laborum.
- followers : 3512
- following : 2978
linkedin:
- url : https://linkedin.com/in/schaefer2024
- username : schaefer2024
- bio : Dolorem ut velit facilis rerum earum.
- followers : 1795
- following : 1031
That persistent drip, drip, drip from your bathroom faucet can really get on your nerves, can't it? It's more than just an annoying sound; it's a constant reminder of wasted water and, quite frankly, money literally going down the drain. You might feel a bit helpless watching those drops fall, but what if you could actually make it stop? You really can, and it's not as hard as you might think, honestly.
Many people shy away from home repairs, thinking they're too complicated or that you need some kind of special knack. But when we talk about how to fix a leaky faucet in bathroom, we're simply talking about making something that's broken or not working properly, work well again. It's about taking something that's unstable, like that constant drip, and making it firm and steady once more. You know, like how you'd fix a wobbly table leg to make it stable again, or how cold fixes water into ice. It's about bringing things back to a good, working state.
This guide is here to walk you through the whole process, step by step, so you can tackle that annoying drip with confidence. We'll show you how to mend that broken flow, adjust things just right, and get your faucet back to a satisfactory condition. By the time you're done, you'll have dealt with that problem and made your bathroom a quieter, more water-efficient place. It's almost like giving your faucet a little tune-up, so to speak, to make it perform its best.
Table of Contents
- Why Your Faucet is Crying
- Gathering Your Repair Arsenal
- The Step-by-Step Fix
- When to Call a Pro
- Frequently Asked Questions About Faucet Fixes
Why Your Faucet is Crying
A leaky faucet is, well, basically a sign that something inside isn't quite holding firm anymore. It's like a tiny, very slow break in the system. Most of the time, the issue comes from worn-out parts that are supposed to create a tight seal, preventing water from escaping when the faucet is off. Think of it this way: water is trying to be fixed in place, not moving, but a tiny gap lets it sneak by. So, what are these sneaky culprits, you know?
Worn Washers: This is, arguably, the most common reason. Inside your faucet, especially older two-handle types, there are rubber washers that get compressed every time you turn the water off. Over time, these washers can harden, crack, or just wear thin. When they do, they can't create that perfect, firm seal anymore, and water starts to seep through. It's a bit like an old shoe sole that's lost its grip.
Damaged O-Rings: Many faucets, especially single-handle ones, use small rubber O-rings to seal different moving parts. These rings can dry out, crack, or become dislodged, causing leaks around the handle or base of the spout. They are meant to hold things tightly, but when they lose their shape, they just can't. They really are quite important, too.
Corroded Valve Seats: The valve seat is where the compression washer presses down to stop the water flow. Mineral deposits from hard water can build up on this seat, making its surface rough and preventing a tight seal. This is a problem where the "firm" contact needed to stop the flow just isn't happening. It's a bit like trying to close a door that has debris in the frame, you know?
Worn Cartridge: Modern single-handle faucets often use a cartridge, which is a self-contained unit that controls water flow and temperature. If this cartridge gets old or damaged, it can cause leaks from the spout or around the handle. Replacing the cartridge is usually the way to fix this particular problem, as it means putting in a whole new control unit that is, hopefully, perfectly stable.
Loose Parts: Sometimes, it's as simple as parts inside the faucet becoming loose over time. A quick tightening can often fix this, making everything firm and stable again. It's a surprisingly common thing, actually, that just needs a little bit of attention to make things right.
Gathering Your Repair Arsenal
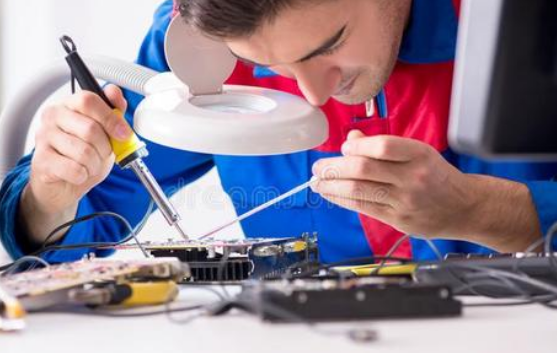
Before you even think about touching that dripping faucet, it's a really good idea to gather all your tools and any replacement parts you might need. Having everything ready means you won't have to stop halfway through the job to hunt for something. It makes the whole process smoother and helps you effectively make the repair. You know, being prepared is half the battle, so to speak.
Adjustable Wrench: This is your primary tool for loosening and tightening nuts. It's essential for getting a firm grip on those plumbing connections. You'll use it to make sure everything is good and tight when you put it back together, basically.
Screwdrivers (Phillips and Flathead): You'll need these for removing decorative caps and screws that hold the faucet handle and other components in place. They help you get into the faucet's insides to reach the problem parts, allowing you to really get at the source of the issue.
Pliers: Slip-joint pliers or needle-nose pliers can be handy for gripping small parts or pulling out stubborn pieces. They give you that extra bit of leverage to firmly remove or adjust things. They are, in a way, like an extension of your fingers for those tricky spots.
Utility Knife or Flat-Head Screwdriver (small): Useful for prying off decorative caps or trim pieces without causing damage. You need something thin and strong to carefully lift these bits, so you can access what needs fixing.
Replacement Parts: This is crucial. You'll likely need new washers, O-rings, or a cartridge. It's often best to remove the old parts first, then take them to a hardware store to ensure you get an exact match. Getting the right part means you can truly make the faucet firm again. Sometimes, you can even buy a general repair kit that has a variety of common sizes, which is pretty convenient.
Plumber's Grease (Silicone-based): This isn't just for lubrication; it helps create a better seal and makes it easier to reassemble parts. It helps keep things stable and moving smoothly. It's a very helpful little addition, honestly, for making sure things fit together nicely.
Clean Rags or Towels: For wiping up spills and protecting your sink basin from scratches. You'll want to keep things neat and dry, especially when you're working with water lines. They are good for just keeping things tidy, too.
Bucket or Bowl: To catch any residual water when you disconnect the lines. You know, water will definitely come out, so be ready.
Flashlight or Headlamp: Sometimes the space under the sink is dark, and good lighting helps you see what you're doing. Being able to clearly see the connections helps you make sure everything is properly fixed. It's surprisingly helpful, that.
The Step-by-Step Fix
Alright, with your tools ready and a good idea of what you're dealing with, it's time to actually get to work. This is where you put the "fix" into action, making that leaky faucet stable and quiet once more. Just take your time, and remember, it's about making precise adjustments and replacements to deal with the problem. You can do this, you know, just take it one step at a time.
Shutting Off the Water
This is, arguably, the most important first step. You absolutely do not want water gushing everywhere while you're trying to work. Look under your sink for two small valves, one for hot water and one for cold. Turn them clockwise until they are completely closed. This stops the water flow to the faucet, making it safe to work on. Make sure they are really, really tight, to truly fix the water flow from coming through. You'll hear the water stop flowing, hopefully, which is a good sign.
Draining the Lines
Even after turning off the water, there will still be some water left in the faucet lines. Turn on both the hot and cold handles of the faucet to let any remaining water drain out. You might want to put your bucket under the spout to catch these last drips. This step ensures that when you start taking things apart, you won't have any unexpected splashes. It's just a little bit of a precaution, really, to keep things clean and dry.
Dismantling the Faucet
Now comes the part where you start taking things apart. The exact steps will vary a little bit depending on the type of faucet you have. There are generally a few common types, and each has its own way of being taken apart to get to the core problem. You're trying to get to the heart of what's causing the leak, so to speak.
For Compression Faucets (Two Handles): These are often older faucets. You'll usually find a decorative cap on top of each handle. Carefully pry these off with a small flat-head screwdriver or utility knife. Underneath, there will be a screw holding the handle in place. Unscrew it and lift off the handle. Next, you'll see a packing nut, which is a hexagonal nut. Use your adjustable wrench to loosen and remove this nut. Underneath the packing nut, you'll find the stem, which holds the washer. Pull the stem out. This whole process is about carefully disassembling parts to get to the worn washer that needs replacing, so you can make the seal firm again.
For Cartridge Faucets (Single Handle): These are quite common in modern bathrooms. Look for a small screw or set screw, often hidden under a decorative cap or a small plastic button on the side or front of the handle. Remove this screw and pull the handle straight up and off. Below the handle, you'll usually see a retaining nut or clip holding the cartridge in place. Remove this. You might need pliers to gently pull the cartridge straight up and out. This whole unit is what controls the flow, and if it's faulty, you need to replace the whole thing to fix the leak. It's a bit like replacing a whole engine part, if you will, to get things running smoothly.
For Ball Faucets (Single Handle, often with a rotating ball): These have a unique look. You'll typically find a set screw on the side of the handle base. Loosen this screw and lift off the handle. Then, use your adjustable wrench to loosen the cap or collar that holds the rotating ball in place. Lift out the ball. Underneath, you'll find spring-loaded rubber seats and springs. These are often the culprits for leaks in this type of faucet. You're basically getting inside to where the water flow is controlled by this ball mechanism, so you can make it firm and stable again.
For Ceramic Disc Faucets (Single Handle): These are generally quite durable. Similar to cartridge faucets, you'll need to remove a decorative cap or button on the handle to access a screw. Remove the screw and lift off the handle. Below the handle, there will be a cover plate and then the ceramic disc cartridge itself, often held in place by screws. Unscrew these and lift out the ceramic disc assembly. If this assembly is cracked or worn, it needs to be replaced to truly fix the leak. It's about replacing the precise mechanism that controls the water, making sure it's perfectly sealed.
Identifying the Culprit
Once you have the internal parts exposed, carefully inspect them. For compression faucets, look at the rubber washer at the bottom of the stem. Is it flattened, cracked, or hardened? For single-handle faucets, examine the O-rings (small rubber rings) on the cartridge or around the ball. Are they brittle, broken, or out of place? If you have a cartridge or ceramic disc unit, look for any visible cracks or signs of wear. Sometimes, you can actually see the problem, like a little tear in the rubber, which is a pretty clear sign. This is where you really pinpoint what's causing the instability in the water flow.
Replacing the Worn Parts
Now, take your new replacement parts. If it's a washer, simply remove the old one from the stem and put the new one in its place. For O-rings, carefully roll the old ones off and slide the new ones into their grooves. A little plumber's grease on new O-rings can help them slide into place and create a better seal, making them truly firm. If you're replacing a cartridge or ceramic disc, simply insert the new unit exactly where the old one was removed. Make sure everything sits snugly and feels firm. This is the core of the "fix," putting in fresh, strong components to make the seal perfect again. It's very satisfying, too, to put in something new.
Reassembling with Care
This is basically the reverse of the dismantling process. Put everything back together in the order you took it apart. Make sure all screws are tightened firmly, but don't overtighten, as you could strip the threads or crack plastic parts. For compression faucets, ensure the packing nut is snug, and the handle screws are secure. For cartridge or ball faucets, make sure the retaining clips or nuts are back in place, holding the new part firmly. The goal here is to make everything stable and secure, just like it was meant to be, so there are no more leaks. You're literally making it firm again, you know?
Testing Your Work
Once everything is back together, slowly turn the hot and cold water supply valves back on under the sink. Don't just blast them open; do it gently. Listen for any sounds of water rushing or dripping. Then, turn on the faucet and let the water run for a minute or two, checking for any leaks around the handle, spout, or connections underneath the sink. Turn the faucet off and watch it closely for a few minutes. If there are no drips, you've successfully fixed your leaky faucet! It's a very satisfying moment, actually, when you see that the problem is truly dealt with. You've made it stable, and that's a good feeling.
When to Call a Pro
While fixing a leaky faucet is often a straightforward DIY job, there are times when it's just better to call in a professional. If you've tried the steps above and the leak persists, or if you encounter something unexpected like rusted pipes, seized nuts, or extensive damage, it might be time to get some expert help. Sometimes, the problem is deeper than just a worn washer, and trying to force things can cause more damage. A professional can quickly diagnose and fix more complex issues, ensuring the job is done right and that your plumbing is truly stable. It's okay to know your limits, you know? Sometimes, a repair needs a bit more specialized attention to truly make it firm.
Frequently Asked Questions About Faucet Fixes
Here are some common questions people often ask when trying to figure out how to fix leaky faucet in bathroom.
How much does it typically cost to fix a leaky faucet?
The cost to fix a leaky faucet really varies quite a bit, depending on if you do it yourself or hire someone. If you tackle it as a DIY project, your cost might only be for the replacement parts, which could be just a few dollars for a pack of washers or O-rings, or perhaps $15-$50 for a new cartridge. It's a pretty low cost, actually, for the satisfaction of fixing it yourself. If you decide to call a plumber, the cost will include their labor, which can range from about $75 to $200 or more, depending on your location and the complexity of the repair. They might also charge for the parts they use. So, doing it yourself is definitely the more budget-friendly option to make that faucet stable again.
What causes a leaky faucet, and can I prevent it?
As we talked about, most leaks come from worn-out internal components like rubber washers, O-rings, or cartridges. These parts simply degrade over time due to normal use, water pressure, and mineral deposits from hard water. The constant pressure and friction just wear them down, so they can't hold things firm anymore. You can't completely prevent wear and tear, but you can definitely extend your faucet's life. Regularly cleaning your faucet to remove mineral buildup can help. Also, being gentle when turning the handles, rather than forcing them, can reduce stress on the internal parts. Using a water softener if you have very hard water can also make a big difference, as it reduces the mineral deposits that cause corrosion and wear on those crucial sealing components. It's about being a bit proactive, you know, to keep things in good working order.
Is a leaky faucet considered an emergency, or can it wait?
Generally, a slow, steady drip from a faucet is not an immediate plumbing emergency. It's certainly annoying and wasteful, and you should aim to fix it fairly soon, but it's unlikely to cause catastrophic damage right away. However, if the leak is more than just a drip—say, a constant stream or a leak that's causing water to pool rapidly—then it becomes more urgent. A significant leak can waste a lot of water quickly, potentially leading to higher utility bills and even water damage to your cabinets or floor over time. So, while a drip can wait a little bit, a bigger leak needs your attention more quickly to prevent further problems and truly fix the situation. It's always best to deal with it sooner rather than later, to be honest.
You can learn more about plumbing basics on our site, and you might find more helpful tips on water conservation through fixing leaks.
fix和repair的区别-百度经验
How to Fix Bad Restaurant Reviews | Touch Dynamic
Fix it Stock Photos, Royalty Free Fix it Images | Depositphotos
