Crafting A Dreamy Pink Butterfly Cake: Your Guide To Sweet Success
Detail Author:
- Name : Libby Langosh I
- Username : grant.terry
- Email : jbeahan@prosacco.com
- Birthdate : 1984-03-10
- Address : 38632 Schaefer Expressway New Tremayneport, VA 13787-3049
- Phone : +1 (551) 710-0036
- Company : Zulauf and Sons
- Job : Exhibit Designer
- Bio : Pariatur quis et molestias et. Laudantium odio dolore id quis porro iure quia. Ea voluptatem et dignissimos quam in sit.
Socials
linkedin:
- url : https://linkedin.com/in/joanie_id
- username : joanie_id
- bio : Sit quis eos suscipit officia ut nemo.
- followers : 6660
- following : 1792
instagram:
- url : https://instagram.com/joanie3616
- username : joanie3616
- bio : In a eum aut sunt fugit rem et. Vitae sunt expedita sequi delectus vel. Non dolore non nemo.
- followers : 2779
- following : 938
facebook:
- url : https://facebook.com/dietrich2008
- username : dietrich2008
- bio : Consectetur ex pariatur voluptatibus eius est molestiae eum.
- followers : 1365
- following : 1517
tiktok:
- url : https://tiktok.com/@dietrichj
- username : dietrichj
- bio : Ut ad architecto sunt. Sit qui culpa non similique distinctio et.
- followers : 5195
- following : 1634
There is something truly special about a cake that captures imagination, is that not so? A pink butterfly cake, with its soft colors and whimsical shape, really brings a smile to faces. It is, in a way, more than just a dessert; it is a centerpiece for joy, a symbol of lightness and celebration. Imagine the delight when guests see such a beautiful creation.
This article will show you how to bring this lovely vision to life. We will walk through each step, from picking the right shades of pink to shaping those delicate butterfly wings. You will get simple, practical advice to help you make a cake that looks wonderful and tastes even better. You know, making a cake like this can feel like a bit of a creative adventure.
So, get ready to explore the delightful process of baking and decorating. We will share tips for every part of the journey, making sure your pink butterfly cake is a true showstopper. You will learn how to make it special, a cake that truly stands out, very much like a unique piece of art.
Table of Contents
- The Allure of the Pink Butterfly Cake
- Planning Your Perfect Pink Butterfly Cake
- Baking the Cake Base
- Crafting Your Butterfly Decorations
- Assembling and Decorating Your Cake
- Adding Those Special Touches
- Serving and Enjoying Your Creation
- Common Questions About Pink Butterfly Cakes
The Allure of the Pink Butterfly Cake
A pink butterfly cake holds a special charm, doesn't it? It is a favorite for many celebrations, especially for birthdays or baby showers. The color pink often brings feelings of warmth, gentleness, and happiness. Butterflies, too, represent beauty, change, and new beginnings. So, when you put these two together, you get a cake that is full of meaning and visual appeal. It is a very popular choice, and for good reason, you know.
The magic of this cake is how it combines simple elements to create something truly grand. It is a delightful blend of playful design and classic elegance. People are drawn to its cheerful appearance, which promises a sweet experience. This cake, in a way, makes everyone feel a little bit more joyful.
Creating one of these cakes allows for a lot of personal expression. You can make it as simple or as detailed as you like. It is a project that brings satisfaction, seeing your vision come to life. The smiles it brings are, perhaps, the best reward.
Planning Your Perfect Pink Butterfly Cake
Before you even think about baking, a little planning goes a long way. This part is about getting organized so the whole process runs smoothly. You want to have everything ready, you know, before you start. It makes things much easier, honestly.
Gathering Your Cake Supplies
First, think about what you will need. You will want basic baking tools like mixing bowls, measuring cups, and spoons. Cake pans are, of course, essential. For a butterfly shape, sometimes two round pans work best, or a sheet cake you can cut. You will also need ingredients for your cake and frosting, naturally. Consider parchment paper to prevent sticking, too. Having these things ready saves you time later on, which is good.
For decorating, you will want piping bags and various tips for the frosting. A spatula or offset knife helps spread frosting evenly. For the butterflies themselves, you might need special cutters or stencils. Edible glitter or sprinkles can add a nice touch. It is like gathering all your art supplies before starting a painting, you know, you want it all there.
Picking Your Pink Shades
Now, let us talk about pink. There are so many lovely shades! You could go for a very soft, light pink, almost pastel. Or, you might prefer a brighter, more vibrant pink. Some people even like to use a few different pinks for an ombre effect, going from light to dark. This can make the cake look really interesting, you know, with depth.
Achieving that perfect pink hue for your cake can be a bit like finding just the right shade for sterling silver, you know, it needs to be just so. Food coloring gels are usually best for getting a rich color without changing the texture of your frosting too much. A little bit goes a long way, so start with just a drop or two and add more if needed. You can always make it darker, but making it lighter is hard. Think about the overall feeling you want the cake to have. Do you want it to be playful, or more elegant? The shade of pink helps set that tone, apparently.
Baking the Cake Base
The foundation of any great cake is, well, the cake itself. A delicious and properly baked cake makes all the difference. This part is pretty straightforward, but a few tips can help you get the best results, honestly.
The Ideal Cake Mix
You can use a box mix for convenience, or bake from scratch if you prefer. For a moist cake, adding an extra egg yolk or a bit of sour cream to a box mix can work wonders. Vanilla or strawberry flavors are usually very popular for a pink butterfly cake. The key is to not overmix the batter; just mix until everything is combined. Overmixing can make the cake tough, which we do not want.
Make sure your ingredients are at room temperature, too. This helps them blend together smoothly and creates a better texture in the finished cake. It is a small step, but it really makes a difference. You want that soft, tender crumb, more or less.
Getting the Right Shape
For the butterfly shape, you have a couple of options. One common way is to bake two round cakes. Once cooled, you cut each round cake in half. Then, you arrange these four half-circles to form butterfly wings. The straight edges of the halves meet in the middle, and the curved edges become the outer wings. This is a pretty simple way to get the shape, you know, without needing special pans.
Another method involves baking a sheet cake and then cutting out the butterfly shape using a template. You can print a butterfly outline, place it on your cooled cake, and carefully cut around it. This gives you a lot of freedom with the size and style of your butterfly. Just make sure your cake is completely cool before you try to cut it, otherwise it might crumble, you know, and that is not what we want.
Crafting Your Butterfly Decorations
This is where the magic really happens, making those beautiful butterflies. These will be the stars of your cake, honestly. There are a few ways to create them, each with its own charm. You can make them ahead of time, which is usually a good idea.
Edible Butterflies: Wafer Paper or Fondant
Wafer paper, also known as rice paper, is a very popular choice for edible butterflies. It is thin, light, and almost translucent, which gives the butterflies a delicate, lifelike appearance. You can buy pre-printed wafer paper butterflies, which saves a lot of time. Or, you can buy plain wafer paper and cut and decorate them yourself. They are very easy to work with, you know, and they stand up well on a cake.
Fondant is another good option. It is a sugar paste that you can roll out very thin. You can use butterfly cutters to get perfect shapes. Fondant butterflies tend to be a bit thicker and more substantial than wafer paper ones. You can color the fondant any shade of pink you like, or even add patterns. Once cut, you usually let them dry for a bit so they hold their shape, especially if you want them to have a slight curve, sort of like real wings.
Designing Your Butterfly Wings
Whether you use wafer paper or fondant, you can add details to your butterflies. For wafer paper, edible food pens or edible dusts can be used to add veins or patterns to the wings. You can also lightly brush them with edible glitter for a shimmering effect. To make them look like they are flying, gently fold the wafer paper butterflies along their body line before placing them on the cake. This gives them a lovely dimension, honestly.
For fondant butterflies, you can impress patterns using texture mats or even small tools. You can also use edible paints to add more color or details. If you want them to look even more realistic, you can place them on a curved surface, like a rolling pin or a piece of crumpled foil, while they dry. This helps them set with a natural curve, you know, making them look ready to take flight. A little bit of creativity here goes a long way.
Assembling and Decorating Your Cake
This is where all your hard work comes together. Putting the cake layers together and frosting them carefully makes a big difference in the final look. It is a satisfying part, too, seeing it all take shape.
Layering and Filling
Once your cake layers are completely cool, you will want to level them. Use a serrated knife or a cake leveler to make the tops flat. This ensures your cake layers stack neatly without wobbling. For the filling, you can use more buttercream, or perhaps a fruit curd like raspberry or strawberry to complement the pink theme. Spread an even layer of filling on each cake layer before stacking the next one. You want a nice balance of cake and filling, you know, in every bite.
If you are making the butterfly shape from two round cakes, arrange the cut halves on your cake board before you start layering and filling. This way, you can build up the layers in the correct butterfly shape from the beginning. Make sure your cake board is sturdy enough to hold the weight of your finished cake, too. A good foundation is always important, basically.
Frosting for a Smooth Finish
A crumb coat is your best friend for a smooth finish. This is a very thin layer of frosting applied to the entire cake, which traps any loose crumbs. Chill the cake in the fridge for about 15-20 minutes after the crumb coat. This makes the crumbs set and gives you a firm surface for your final layer of frosting. It is a really important step, honestly.
For your final frosting layer, apply a generous amount and smooth it out using a spatula or cake scraper. You can make it perfectly smooth or create a textured look, depending on what you like. Remember those pink shades you picked? Now is the time to use them. You could do a lighter pink for the main cake and a darker pink for details, perhaps. The smoothness of the frosting really makes the butterflies pop, you know.
Placing Your Butterflies
This is the fun part! Once your cake is frosted, it is time to arrange your butterflies. Think about how real butterflies might land on a flower. You can place them seemingly at random, or create a pattern. Some might be clustered together, while others fly solo. You can even have some slightly hanging off the edge of the cake, which gives a dynamic feel, you know.
For wafer paper butterflies, a tiny dot of frosting on the back is usually enough to make them stick. For fondant butterflies, a little bit of edible glue or water can help them adhere. You can also use thin wires, if they are food-safe, to make some butterflies appear to float above the cake. This creates a very magical effect, honestly. It is all about making it look like they just landed, or are about to take off.
Adding Those Special Touches
To make your pink butterfly cake truly unforgettable, a few extra touches can make a big difference. These small details can elevate your cake from pretty to absolutely stunning. It is like adding the finishing touches to a special outfit, you know, it just completes the look.
Sparkle and Shine
Edible glitter or dust is a fantastic way to add sparkle. You can brush it onto the butterflies themselves, or lightly dust the entire cake. A little shimmer catches the light beautifully and adds a touch of fantasy. Pearl dust can give a soft, iridescent glow, while disco dust provides a more intense sparkle. Just be sure to use products that are specifically labeled as "edible," which is very important for safety, you know.
You can also use edible pearls or small silver dragees to add tiny points of light. These can be placed around the base of the cake, or scattered among the butterflies. They add a bit of texture and visual interest. It is like adding tiny jewels to your cake, honestly, making it feel very precious.
Other Fun Accents
Consider adding small edible flowers, either fresh or made from gumpaste or fondant. Pink roses or cherry blossoms would complement the butterfly theme beautifully. You could also pipe small dots or swirls of frosting around the base of the cake or along the edges of the butterfly wings for extra detail. This adds a nice border, you know, or a bit of texture.
A simple piped border around the bottom of the cake can give it a very finished look. You could use a contrasting pink or even white for this. Sometimes, less is more, but a few well-placed accents can really make the cake sing. It is all about balance, apparently, making sure every part works together.
Serving and Enjoying Your Creation
After all your hard work, the moment arrives to share your beautiful pink butterfly cake. Presenting it well adds to the excitement. Place it on a nice cake stand, perhaps, to show it off. Make sure you have a good, sharp knife for clean slices. You know, a clean cut makes serving much easier.
Take a moment to admire your creation before cutting into it. This cake is a labor of love, and it deserves its moment in the spotlight. Seeing the joy on people's faces as they see and taste your cake is, quite frankly, a wonderful feeling. It is a moment to savor, really.
Common Questions About Pink Butterfly Cakes
People often have questions when making a special cake like this. Here are some common ones that come up, you know, to help you out.
How do you make a butterfly cake shape?
One simple way involves baking two round cakes. Once they are cool, cut each round cake in half. Then, arrange these four half-circles on your cake board. The straight edges of the halves meet in the middle, forming the butterfly's body, and the curved edges become the wings. You can also bake a sheet cake and use a paper template to cut out the butterfly shape directly from the cooled cake. This offers a lot of flexibility in size and style, too.
What kind of frosting is best for a butterfly cake?
Buttercream frosting is usually a very popular choice for a pink butterfly cake. It is easy to color, holds its shape well for piping details, and tastes delicious. Swiss meringue buttercream or American buttercream both work wonderfully. Cream cheese frosting is also an option, but it is a bit softer, so it might need more chilling time to firm up, you know, especially if you are doing intricate designs. The key is to have a frosting that is stable enough to hold your decorations.
Can I make the butterflies ahead of time?
Absolutely, you can! Making your edible butterflies in advance is actually a very good idea. Wafer paper butterflies can be made weeks ahead and stored in an airtight container at room temperature, away from moisture. Fondant butterflies also benefit from drying for a day or two to firm up, and they can be stored similarly. This helps reduce stress on the day you assemble the cake. It is a smart way to manage your time, really, and ensures your butterflies are perfectly set. You can learn more about cake decorating techniques on our site, and for more specific ideas, link to this page for more pink butterfly cake inspiration.
For more baking tips and delightful recipes, you might find useful resources at a general baking website, such as Allrecipes, where many home bakers share their experiences. Remember, the goal is to have fun with it, you know, and create something truly memorable.
Paper Texture with Smooth Pastel Pink Color Perfect for Background

90+ Pink Color Codes (With Pink Color Chart & Hex Codes) | Pink color
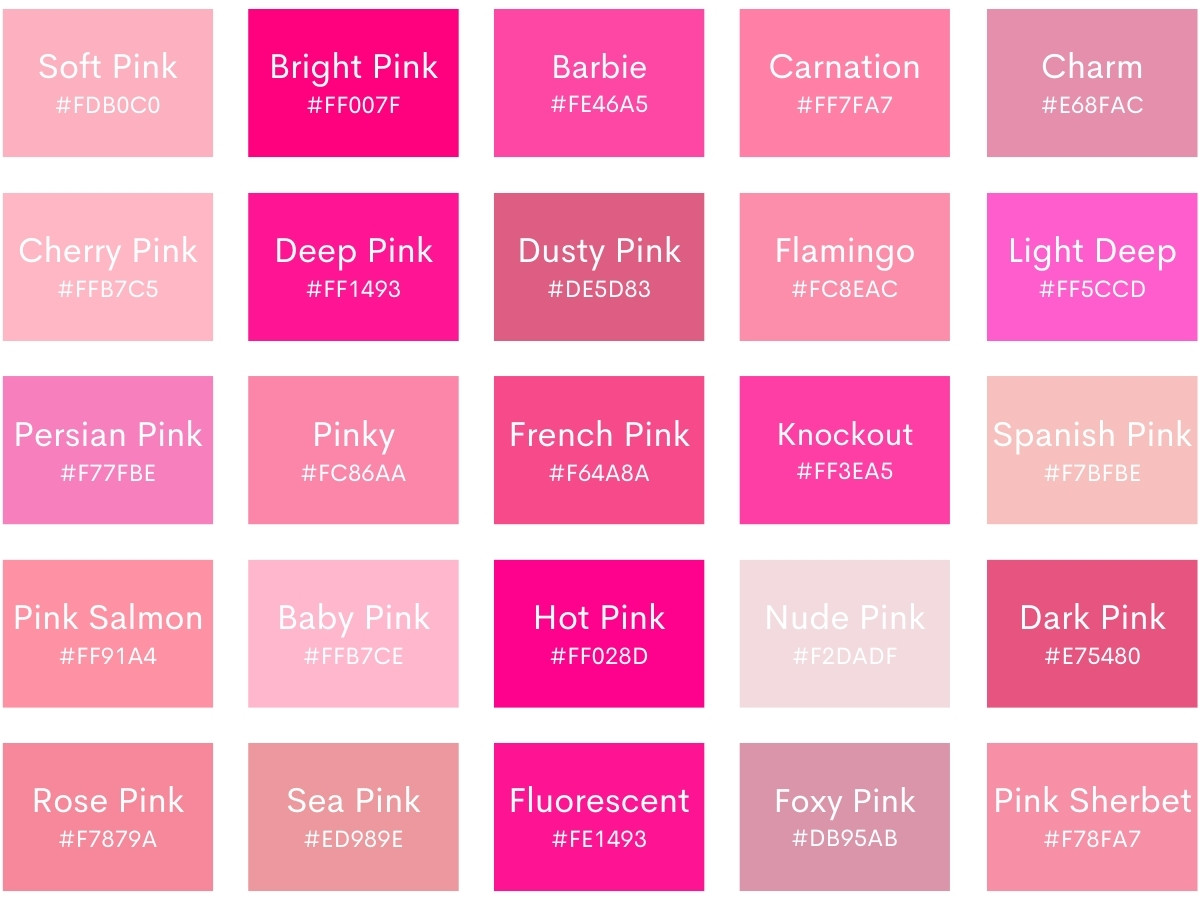
129 Shades Of Pink Color With Names, Hex, RGB, CMYK Codes
