How To Craft An Armor Stand In Minecraft: Your Ultimate Display Guide
Detail Author:
- Name : Millie Brakus
- Username : schmeler.hertha
- Email : jones.misael@kuhlman.com
- Birthdate : 1976-11-26
- Address : 406 Allan Ways Apt. 866 Lake Groverland, NC 78879-5246
- Phone : +1-872-239-0863
- Company : Durgan, Halvorson and Deckow
- Job : Poultry Cutter
- Bio : Sit illo aut et inventore mollitia. Quo laudantium ab qui tenetur.
Socials
linkedin:
- url : https://linkedin.com/in/gia6671
- username : gia6671
- bio : Ut provident itaque dolorem vitae et sit ducimus.
- followers : 5561
- following : 777
instagram:
- url : https://instagram.com/leschg
- username : leschg
- bio : Natus repellat sint vitae est non neque quia. Nihil corrupti accusantium omnis fuga dolores.
- followers : 2773
- following : 2025
twitter:
- url : https://twitter.com/gialesch
- username : gialesch
- bio : Magnam sit quo neque iusto quos. Cupiditate dicta fugiat rem eos quisquam. Nemo quae consequatur animi harum.
- followers : 2346
- following : 349
facebook:
- url : https://facebook.com/gia_lesch
- username : gia_lesch
- bio : Alias expedita id inventore omnis quam. Veritatis quis dolores sint quo qui.
- followers : 1676
- following : 1137
tiktok:
- url : https://tiktok.com/@gia.lesch
- username : gia.lesch
- bio : Veritatis quisquam veniam exercitationem impedit omnis enim.
- followers : 4783
- following : 2993
Have you ever wanted to show off your coolest gear in Minecraft? Maybe you've got that shiny enchanted armor, or perhaps a unique mob head you're really proud of, and you just want a good spot for it, you know? Well, that's where knowing how to craft an armor stand comes in handy.
This useful item lets you put your favorite wearable things on display, making your base feel a little more lived-in and, well, less lonely, actually. It's a pretty neat way to add some personal flair to your virtual home, and it’s very satisfying to see your hard-earned items showcased.
Today, we're going to walk through the whole process, from gathering what you need to putting it all together, and even how to make the most of it once it's built, so you can start decorating your world right away. This guide, as of today, May 17, 2024, covers the current way to make these helpful items.
Table of Contents
- What is an Armor Stand?
- Why Make an Armor Stand?
- Gathering Your Materials
- The Crafting Process: Step-by-Step
- Using Your Armor Stand Effectively
- Troubleshooting Common Crafting Issues
- Frequently Asked Questions About Armor Stands
What is an Armor Stand?
An armor stand is a very helpful item in Minecraft. It looks like a simple wooden figure, sort of like a mannequin, and it's there to hold things you can wear. This includes all sorts of armor pieces, naturally, but it also works for other items like carved pumpkins, mob heads you might have collected, or even your elytra wings. It's a way to put these items out for everyone to see, a bit like a personal museum for your cool stuff.
It's a static object, meaning it doesn't move on its own, but you can place it anywhere you like in your game world. Players often use them in their homes, in special display rooms, or even out in the open to mark a spot. They are a valuable item for showing off your finest armor and the results of your mob fights, so it’s pretty useful, you know?
The basic idea is to give your wearable items a place to sit when you're not using them, or just to make them look good. It's a way to bring some life and a personal touch to your builds. It’s a pretty simple thing, yet it adds a lot to the look and feel of your base, honestly.
Why Make an Armor Stand?
There are quite a few good reasons to put together an armor stand in your Minecraft world. For one, it’s a great way to keep your armor organized. Instead of just having it sit in a chest, where you can’t really see it, you can put it on a stand. This makes it easy to see what you have, and it looks much tidier, you know?
Beyond just organization, armor stands are fantastic for decorating. Displaying your armor is, in a way, a sign of pride in Minecraft. If you've spent time getting a full set of enchanted diamond or netherite armor, you probably want to show it off. An armor stand lets you do just that, turning your gear into a cool part of your base's design.
Many players love showing off their Minecraft creations, and armor stands help with this. You can make special rooms just for displaying different armor sets, or put them in your main living area to add some visual interest. It also makes your base feel less empty, especially if you're playing by yourself. It’s almost like having a silent companion, you know, just standing there.
They can also be used for practical purposes, like quickly swapping out armor sets before a big battle, or just having a spare set ready to go. It’s a pretty simple item that offers a lot of ways to make your game experience better, honestly.
Gathering Your Materials
To craft an armor stand, you'll need two main types of items: sticks and a smooth stone slab. Getting these items is a pretty straightforward process, but it does involve a few steps, especially for the smooth stone slab. Let’s go through what you’ll need and how to get it, so you’re ready to build.
Sticks
Sticks are a very common item in Minecraft, and you'll need six of them for your armor stand. Getting sticks is pretty easy, actually. You start by finding any type of wood in the game. This means punching down trees to get wood blocks. Any kind of wood works, whether it's oak, birch, spruce, or anything else you find.
Once you have some wood blocks, you’ll want to open your crafting menu. You can do this in your inventory, which gives you a small 2x2 crafting grid, or by using a crafting table, which gives you a bigger 3x3 grid. Place your wood blocks into any square in the crafting grid, and they will turn into wood planks. Each wood block gives you four wood planks, so you won’t need many trees to get what you need, you know?
After you have wood planks, you can then turn those into sticks. Place two wood planks, one on top of the other, in any column of your crafting grid. This will give you four sticks. Since you need six sticks for the armor stand, you'll want to make sure you have at least two wood blocks to start with, which will give you enough planks to make the sticks you need. It’s a very basic crafting step, but essential.
Smooth Stone Slab
The smooth stone slab is the other material you need, and it’s a bit more involved to get than sticks, but still pretty easy. You’ll need just one of these. To get a smooth stone slab, you first need to get stone. Stone is found almost everywhere underground in Minecraft. You’ll need a pickaxe to mine it. When you mine stone, you get cobblestone, you know?
Once you have cobblestone, you need to turn it into regular stone. To do this, you’ll need a furnace. If you don't have a furnace yet, you can craft one by placing eight cobblestone blocks around the outside edge of a 3x3 crafting grid, leaving the middle square empty. After you have your furnace, place your cobblestone in the top slot and some fuel (like coal, wood, or charcoal) in the bottom slot. The furnace will then smelt the cobblestone into stone.
Now that you have stone, you need to smelt it again to get smooth stone. Yes, that’s right, you smelt the stone you just made! Place the regular stone into the top slot of your furnace, and add more fuel to the bottom slot. The furnace will then smelt the stone into smooth stone. This is a very specific step, so don't skip it, as regular stone won't work for the slab.
Finally, with your smooth stone ready, you can make the smooth stone slab. Open your crafting table. Place three smooth stone blocks in a straight line across any row in the crafting grid. This will give you six smooth stone slabs. Since you only need one for the armor stand, you'll have some extra, which is good for other building projects, you know? It’s a bit of a process, but definitely worth it for the final item.
The Crafting Process: Step-by-Step
With all your materials gathered – that's six sticks and one smooth stone slab – you’re ready to put together your armor stand. The crafting process is fairly specific, but once you see the pattern, it’s quite simple. You'll need a crafting table for this, as the recipe requires the full 3x3 grid.
Opening Your Crafting Table
First things first, find or craft a crafting table. If you don't have one, you can make it by placing four wood planks into each square of your 2x2 inventory crafting grid. Once you have your crafting table, place it down in your world and right-click on it to open its 3x3 crafting interface. This is where all the magic happens for more complex items like the armor stand, you know.
Having the crafting table open is the first real step to making almost anything in Minecraft that isn't super basic. It gives you all the space you need to arrange your items in the right way. Make sure you have enough light around your crafting table, too, just so you can clearly see what you're doing, honestly.
It's a very familiar sight for any Minecraft player, that grid, and it's where countless items come to life. So, with your materials ready, and your crafting table open, you are in a good spot to start the actual making of your armor stand.
Arranging the Sticks
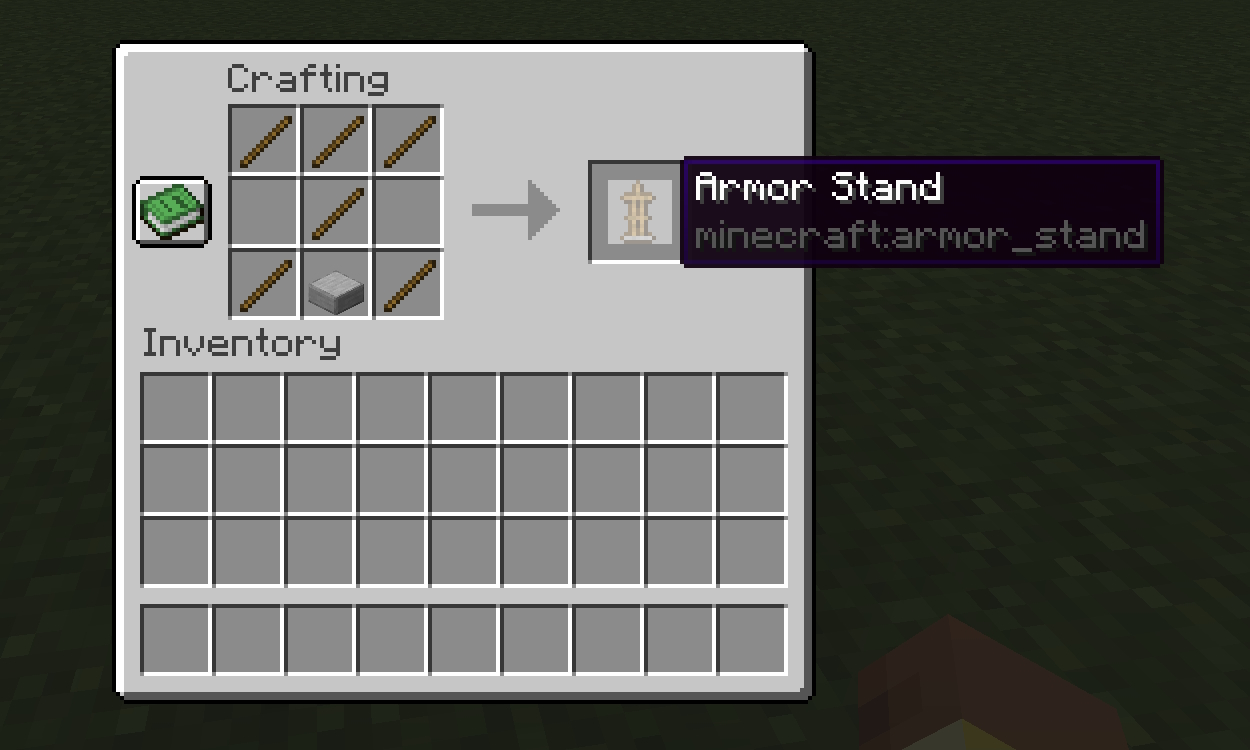
Now, let's place those sticks. You'll need six of them. The pattern for the sticks is a bit like a sideways 'H' or, you could say, a cross shape with a gap. Place three sticks across the top row of the crafting grid. So, that's one stick in the first box of the top row, one in the second, and one in the third.
Next, for the middle row, you'll place a stick in the first box and another stick in the third box. Leave the middle box of the middle row empty for now. This creates the top part of your 'H' shape, or the arms of the cross, you know? It’s a pretty specific layout, so pay close attention to where each stick goes.
Finally, for the bottom row, you'll place just one stick. This stick goes in the first box of the bottom row. So, to recap the sticks: top row is full, middle row has sticks on the ends, and the bottom row has a stick only on the left. This forms a distinct shape that is recognized by the game as part of the armor stand recipe, actually.
Placing the Smooth Stone Slab
With your sticks arranged, it's time for the smooth stone slab. You only need one of these. This slab goes into the very center of the crafting grid. So, that's the middle box of the middle row, the one you left empty when placing the sticks. It fits right in there, completing the overall shape.
When you place the smooth stone slab in that specific spot, the full recipe should now be visible. You'll see the sticks forming that sideways 'H' shape, with the smooth stone slab sitting neatly in the middle, filling that gap. This combination is what the game looks for to create the armor stand, you know.
If you've done it correctly, you should immediately see the armor stand icon appear in the result box on the right side of your crafting table interface. This is your signal that you've got the recipe right. If it doesn't show up, double-check your arrangement, as even one item out of place will prevent the crafting from working. It's a very precise process, after all.
Retrieving Your Armor Stand
Once the armor stand appears in the result box, all you need to do is click on it to pick it up and move it into your inventory. It will then be ready for you to place in your world. Just drag it from the result slot to any open spot in your inventory. You can then close your crafting table interface.
Congratulations! You've successfully crafted an armor stand. This is the only recipe for how to craft an armor stand in Minecraft, so once you've learned it, you're good to go for all your future display needs. It’s a pretty rewarding feeling to make something useful like this, honestly.
Now that you have your armor stand, you can carry it around with you until you find the perfect spot to set it up. It acts just like any other block or item you place in the world. So, you're ready for the next step: putting it to good use in your base, you know.
Using Your Armor Stand Effectively
Having an armor stand is just the beginning; the real fun comes from using it to display your items and decorate your space. Using an armor stand in Minecraft is straightforward, and there are many creative ways to make it a part of your builds. Simply place it on the ground where you want it to stand, just like you would place any other block, you know.
Displaying Gear
The main purpose of an armor stand is to show off wearable items. Once you've placed your armor stand, you can put armor, carved pumpkins, mob heads, or elytra on it. To do this, simply hold the item in your hand and right-click on the armor stand. Each right-click will place one piece of gear onto the stand. For example, right-click with a helmet in hand, and it will go onto the stand's head slot.
You can put a full set of armor on one stand: helmet, chestplate, leggings, and boots. You can also swap out pieces by right-clicking with a different item in your hand; the old item will pop off and go into your inventory, and the new one will take its place. This makes it super easy to change up your displays or prepare different sets of gear for various adventures, actually.
It's a great way to keep your best gear visible and organized, rather than buried in a chest. Imagine having a whole wall of armor stands, each showing off a different enchanted set, or perhaps a collection of rare mob heads. It truly makes your base feel more like a home, with your personal achievements on display.
Posing Your Armor Stand
Did you know you can make your armor stand strike a pose? It's a very cool feature that adds a lot to its decorative potential. To change the pose of an armor stand, you need to crouch (by holding down the Shift key by default) and then right-click on the armor stand. Each time you do this, the stand will change to a different pose.
There are several poses available, from a simple standing position to more dynamic action poses. You can make it look like it's walking, fighting, or even bowing. This ability to pose your armor stands really opens up possibilities for storytelling and making your builds more lively. You can create little scenes, you know, with your armored figures.
Experiment with different poses to see what looks best with the armor you're displaying or the scene you're trying to create. Maybe you want a knight standing guard by your door, or a hero striking a triumphant stance in your trophy room. The posing feature is a subtle but powerful way to add character to your Minecraft world, honestly.
Creative Uses and Decor
Beyond just holding armor, armor stands have many other creative uses. Because they can hold mob heads, you can use them to display your collection of rare drops from bosses or unique creatures. Imagine a room with all the different mob heads you've gathered, each on its own stand. It’s a very impressive sight, you know.
Players also use armor stands in clever ways to create custom decorations or even furniture. With careful placement and posing, you can make them look like chairs, tables, or even parts of statues. Some players hide the armor stand itself and just use the items on it to create floating displays or special effects within their builds.
You can also use them to create little scenes, like a guard standing
How to Make an Armor Stand in Minecraft | Beebom

How To Equip An Armor Stand In Minecraft at Dennis Marquis blog

How To Make An Armor Stand In Minecraft - GameSpot
