How To Draw A Boy: Simple Steps For Beginners
Detail Author:
- Name : Earlene Konopelski PhD
- Username : elta29
- Email : lottie49@ohara.com
- Birthdate : 1994-05-11
- Address : 151 Abner Groves Lake Evert, NY 85432-2458
- Phone : +16234512601
- Company : Breitenberg Group
- Job : Set Designer
- Bio : Laborum libero nulla voluptatem. Sapiente aut ut qui occaecati. Libero est sequi ipsam excepturi numquam repudiandae magni. Consequatur rerum incidunt fugit modi quae.
Socials
twitter:
- url : https://twitter.com/bella.cummings
- username : bella.cummings
- bio : Beatae voluptate omnis est. Molestiae voluptatem unde porro.
- followers : 2734
- following : 1691
linkedin:
- url : https://linkedin.com/in/bcummings
- username : bcummings
- bio : Ea fugit corrupti quia possimus unde.
- followers : 2671
- following : 2486
facebook:
- url : https://facebook.com/bellacummings
- username : bellacummings
- bio : Repudiandae veniam in numquam. Possimus rerum deleniti odio velit natus.
- followers : 4141
- following : 1360
Learning to draw can feel like a wonderful adventure, and, you know, figuring out how to draw a boy is a really popular starting point for many aspiring artists. Perhaps you want to sketch a character for your own comic strip, or maybe you just feel like putting some ideas down on paper. It's a pretty useful skill to have, and honestly, it can be a lot of fun, too. We're going to walk through the process together, making it simple for anyone, even if you're just picking up a pencil for the very first first time.
Many people feel a little unsure where to begin when they first try to draw a person. It's totally fine to feel that way; a lot of us do, actually. The good news is that drawing a boy, or any person for that matter, is much easier than it might seem at first glance. It's all about breaking things down into smaller, more manageable steps, and, you know, we'll cover that right here. We'll look at the basic shapes that form a body, and then slowly build up the details.
Today, as of [Current Date, e.g., May 27, 2024], we're going to explore not just the traditional pencil-and-paper methods, but also some fantastic online tools that can help you create digital artwork. You can find free online drawing applications that let you paint with natural brushes, add layers, and even export your creations to popular image formats like JPEG or PNG. Some of these tools, like Drawisland, are really simple and powerful, allowing you to create freestyle drawings or use shapes like rectangles and circles. Others, like Canva's free drawing tool, help you add customized drawings to your designs, making them stand out. So, you have lots of ways to get started, whether you prefer physical or digital art supplies, which is pretty neat.
Table of Contents
- Getting Started: Your Drawing Supplies
- The Foundations: Basic Shapes for a Boy's Body
- Step-by-Step Guide: Drawing a Boy's Head and Face
- Building the Body: From Stick Figure to Form
- Different Approaches to Drawing a Boy
- Making Your Drawings Come Alive
- Practicing and Improving Your Skills
Getting Started: Your Drawing Supplies
Before you even make your first mark, it's a good idea to gather what you'll need. You don't, you know, have to go out and buy a lot of fancy things. Just some basic items will do the trick, especially when you are just getting started with something like this. The important thing is to feel comfortable with your tools, so you can focus on the drawing itself.
What You'll Need
For traditional drawing, you'll want some paper, of course, and a few pencils. A regular HB pencil is great for sketching out light lines. You might also like a softer pencil, like a 2B or 4B, for darker lines and shading later on. An eraser is, you know, pretty essential for fixing any mistakes or lightening up your initial guide lines. And that's really about it for the very basics. You can always add more tools as you go, but these are enough to begin creating a great looking boy.
A simple sketch pad works wonderfully. It's, like, a good idea to have a surface that's not too rough, so your pencil can glide smoothly. Some artists prefer a slightly textured paper, but for beginners, something with a smoother finish is often a bit easier to work with. Remember, the goal here is to make the process enjoyable, so pick supplies that feel good in your hand and are, you know, readily available.
Digital Drawing Tools
If you're more into digital art, there are some truly amazing free online drawing applications available. Many of these allow you to create digital artwork and then export it to formats like JPEG or PNG, which is very convenient. You can paint online with natural brushes, use layers to organize your drawing, and even edit your artwork as you go. Some tools, like Drawisland, are quite simple, offering freestyle drawing, shapes, and options to change sizes and pick colors. They even let you add text, which is a nice touch.
Other platforms, like Magma, are where artists draw, collaborate, and grow together. You can join shared canvases, follow creators you admire, and even take part in live art jams, which is, you know, a pretty cool way to learn. There's also Canva's free drawing tool, which lets you add customized drawings and graphics to your designs. And for those who want a little help, Autodraw pairs machine learning with drawings from talented artists to help you draw stuff fast. So, you have a lot of options to explore, depending on what feels right for you.
The Foundations: Basic Shapes for a Boy's Body
The secret to drawing a boy, or really any human figure, lies in understanding basic shapes. You see, the human body, for the most part, can be broken down into simple forms like circles, ovals, and rectangles. Learning these shapes helps you draw a boy confidently and accurately. It's like building with blocks; you start with the big pieces and then add the smaller details. This approach is, you know, especially good for those just learning how to draw bodies.
Knowing these foundational shapes is key to drawing a realistic young boy. It gives your drawing a solid structure before you add any of the more complex features. This method, you know, makes the whole process feel a lot less overwhelming. You're not trying to draw a perfect boy right away; you're just putting down some basic guides.
Understanding Proportions
When you draw a boy, or any person, thinking about proportions is really helpful. This means looking at how big one part of the body is compared to another. For example, a boy's head is a certain size compared to his torso, arms, and legs. Getting these relationships right makes your drawing look more believable. For children, the head is often a bit larger in proportion to the body than it would be for an adult, which is something to keep in mind, too.
A common way to start is by thinking of the head as a unit of measurement. So, you might say a boy's body is, say, four or five heads tall, depending on his age. This isn't a hard and fast rule, but it gives you a good starting point for laying out your figure. It's, you know, a simple trick that can make a big difference in how balanced your drawing appears. This collection of easy boy drawing ideas is perfect for children, especially beginners, because it often simplifies these ideas.
Starting with Simple Forms
Begin your drawing by sketching light, basic shapes. For the head, an oval or a circle works well. For the torso, a rectangle or a slightly tapered oval can represent the chest and waist area. The arms and legs can start as simple lines or cylinders. You're basically creating a "skeleton" of shapes that you'll build upon. Don't press too hard with your pencil here, as these are just guides that you'll erase later, you know, more or less.
Connecting these shapes with light lines helps you figure out the pose and movement of your boy. Think of it like a stick figure, but with a bit more volume. This initial framework helps you ensure that the limbs are the right length and that the body parts are, you know, in the correct places relative to each other. It's a very forgiving stage, allowing you to adjust things easily before committing to more detailed lines.
Step-by-Step Guide: Drawing a Boy's Head and Face
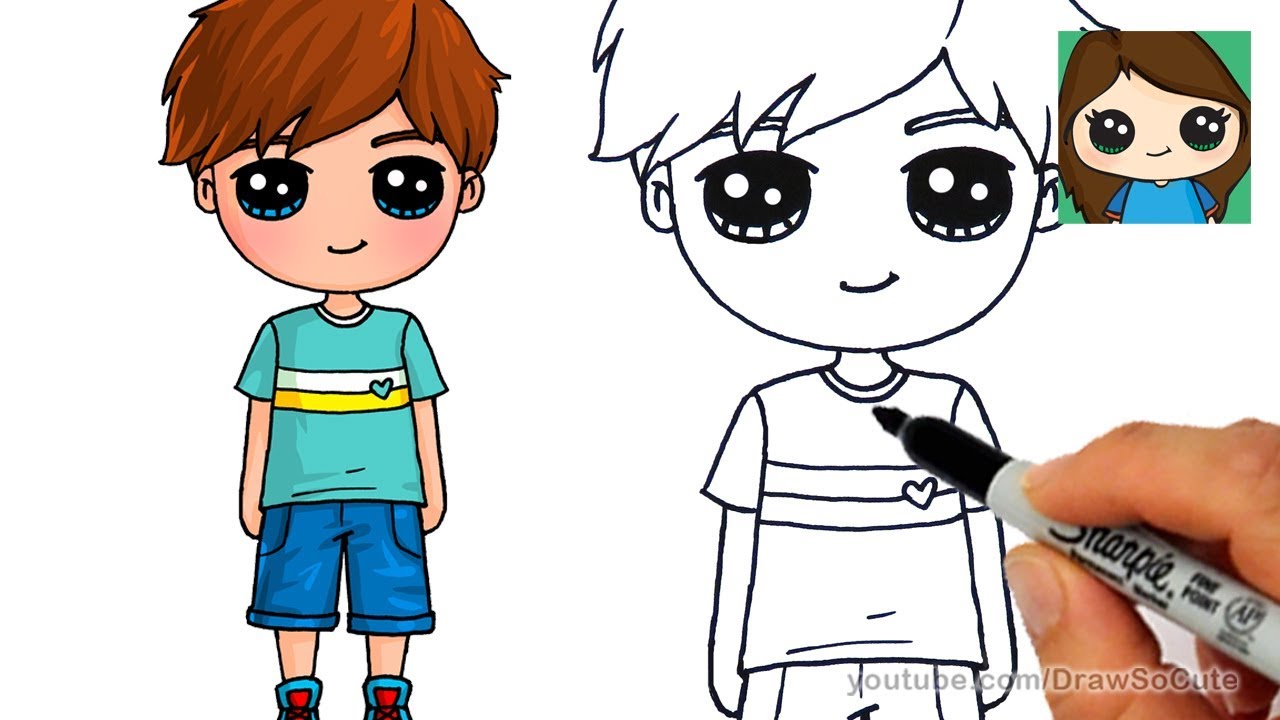
Drawing the head and face is often the first thing people want to get right, and for good reason. It's where a lot of the character and expression come from. This tutorial, you know, focuses a lot on drawing the head and face in a cartoon style, which is often a bit simpler for beginners. We'll go through it step by step, so you can easily draw a perfect boy's face.
The Head Shape
Start by drawing a basic oval or circle for the head. This will be your main guide. Then, draw a light vertical line down the middle of the oval and a horizontal line across the middle. These lines will help you place the facial features evenly. The vertical line shows you the center of the face, and the horizontal line usually indicates where the eyes will go, more or less. You might also want to add another horizontal line lower down for the nose, and one even lower for the mouth, which is pretty typical.
For a cartoon style, the head might be a bit rounder or more exaggerated than a realistic one. Some tutorials suggest starting with a circle and then adding a jawline shape below it, which can give you a bit more control over the face's overall look. Remember to keep these lines very light, as you'll be refining them later. It's just a starting point, you know.
Placing Features
Now, let's add the features. The eyes usually sit on that first horizontal guideline you drew. You can start with simple almond shapes or circles, depending on the style you're going for. The nose often sits about halfway between the eye line and the chin. A simple 'C' shape or a small triangle can work for a basic nose. The mouth goes between the nose and the chin, often a simple curved line or two. Draw an ear on each side, aligning the top of the ear with the brow line and the bottom with the nose line, which is, you know, a pretty common rule of thumb.
For a cute boy, you might make the eyes a bit larger and the nose and mouth a little smaller. This helps give that youthful, appealing look. Don't worry about making them perfect on your first try. It's all about practice, and you can always go back and adjust things. The key is to get the general placement right first, so the face looks balanced, you know.
Adding Hair
Hair can really define your boy's character. Instead of drawing individual strands, think of hair in larger shapes or clumps. You can draw the hat the boy is wearing, if he has one, or simply sketch the overall shape of his hairstyle. Does he have short, spiky hair? A longer, shaggy cut? Maybe a neat, parted style? Start with the general outline of the hair around the head shape. You can then add some simple lines within that shape to suggest texture or direction, which is pretty straightforward.
Consider how the hair falls and whether it covers any part of the forehead or ears. For a cartoon boy, the hair can be simplified into just a few distinct shapes, giving it a clean, graphic look. You can also add a few stray lines to make it look a bit more natural, if you want. It's a good idea to look at different hairstyles for inspiration. This step, you know, really brings the face to life.
Building the Body: From Stick Figure to Form
Once you have the head, it's time to build the rest of the body. Knowing the basic shapes of the human body – the head, torso, arms, and legs – is key to drawing a realistic young boy. This process is, in some respects, similar to drawing any person, but with attention to the proportions that make a figure look like a boy. This one is perfect for those just learning how to draw bodies, so don't worry if it feels a little new.
You'll start with a very simple framework, almost like a stick figure, and then add volume to it. This method helps you get the pose and overall structure correct before adding any of the smaller details. It's a very practical way to approach drawing the human form, you know.
The Torso and Limbs
For the torso, you can draw a rectangular shape for the upper body and a smaller, slightly narrower rectangle or oval for the hips. Connect these two shapes with a curved line to suggest the spine, if you want to show some movement. For the arms and legs, start with simple lines extending from the torso. Then, you can add ovals or cylinders around these lines to give them thickness, which is pretty much how you add volume. Think of the joints—shoulders, elbows, wrists, knees, ankles—as small circles where the limbs bend. This helps you understand how the body moves, you know.
Remember that a boy's proportions will be different from an adult's. Their limbs might be a bit shorter in relation to their body, and their build generally less muscular. Keep your lines light as you construct these shapes, allowing yourself to adjust and refine as you go. This stage is all about getting the overall form and pose right, so don't be afraid to experiment a little, actually.
Hands and Feet
Hands and feet can be tricky, so for beginners, it's best to simplify them. For hands, you can start with a simple oval or a blocky shape for the palm, and then add five smaller, curved lines for the fingers and thumb. Don't try to draw every knuckle or crease. Just get the general shape and placement right. For feet, a wedge shape or a simple rounded rectangle works well. You can then add a small bump for the ankle. It's, you know, often easier to draw them in shoes or socks, which hides some of the complexity.
Focus on the overall silhouette of the hands and feet. Are they open or closed? Pointing or relaxed? Even simple shapes can convey a lot about the pose and action of your boy. Remember, you can always refine these later once you're comfortable with the basic forms. This approach, you know, makes it a lot less intimidating.
Clothing and Details
Once you have the basic body shape, you can start adding clothing. Think about how fabric drapes and folds over the body. Clothes shouldn't look painted on; they should have some volume and wrinkles. Simple shapes like rectangles for shirts and pants work as a starting point. Then, add lines for seams, collars, and cuffs. You can also add small details like buttons, pockets, or a belt, which really make the drawing pop.
Consider the boy's personality when choosing his clothes. Is he wearing a casual T-shirt and shorts, or something a bit more dressed up? These small choices can add a lot to your character. Don't forget about shoes, too. Simple shapes for sneakers or boots can complete the look. Adding these details is, you know, where your boy really starts to come to life.
Different Approaches to Drawing a Boy
There are many ways to draw a boy, and each style offers a unique look and feel. Whether you're drawing your own comic strip or animating a short story, knowing how to draw a boy can come in handy. We'll look at a few common approaches, so you can pick the one that feels right for you, or even combine elements from different styles. It's, you know, all about finding what you enjoy most.
Cartoon Style
Cartoon style drawing often involves simplified lines, exaggerated features, and a focus on expressing emotion clearly. The head might be larger, the eyes bigger, and the limbs a bit more rounded or 'bouncy.' This style is very popular for beginners because it allows for more freedom and less concern about perfect realism. It's about capturing the essence of a boy in a fun, often humorous way. This tutorial, you know, shows how to draw a boy with its main focus on drawing the head and face in a cartoon style, which is very helpful.
When drawing in a cartoon style, you can play with proportions to create different personalities. A very round head might suggest a younger, cuter boy, while a slightly more angular head could suggest an older, more mischievous one. The lines are often clean and bold, and colors are usually bright and flat. It's a really expressive way to draw, and, you know, a lot of people find it very enjoyable.
Realistic Style
Drawing a boy in a realistic style means paying closer attention to anatomy, proportions, and how light and shadow affect the form. This style requires more detail and often involves subtle shading to give the drawing depth. You'll focus on making the features look true to life, from the curve of the cheek to the folds in the clothing. It's a bit more challenging than cartoon style, but also very rewarding when you get it right, which is, you know, pretty cool.
For a realistic approach, you might use more varied line weights – lighter lines for distant parts, darker lines for things closer or in shadow. Understanding how muscles and bones sit under the skin becomes more important. However, even with realism, you still start with those basic shapes. They are the foundation for everything, really. It's about building up layers of detail on top of a solid structure, so it's not, you know, as hard as it might seem.
Quick Sketching
Quick sketching is about capturing the essence of a pose or a moment very quickly, often with just a few lines. It's not about perfection, but about observation and speed. This is a great way to practice drawing boys in different actions and poses without getting bogged down in details. You might use loose, flowing lines to suggest movement, or just block in the major shapes to get the overall form down. It's a fantastic exercise for improving your drawing skills generally.
When quick sketching, you might focus on the "line of action" – an imaginary line that shows the main direction of the body's movement. This helps make your figures feel dynamic and alive. Don't worry about erasing mistakes; just keep drawing. The goal is to train your eye and hand to work together efficiently. It's a fun way to practice, and, you know, you'll see improvements over time.
Making Your Drawings Come Alive
Once you have the basic form down, you can start adding the touches that truly bring your boy to life. This is where you infuse personality and make your drawing feel like a real character. It'
How to Draw a Cute Boy Easy - YouTube
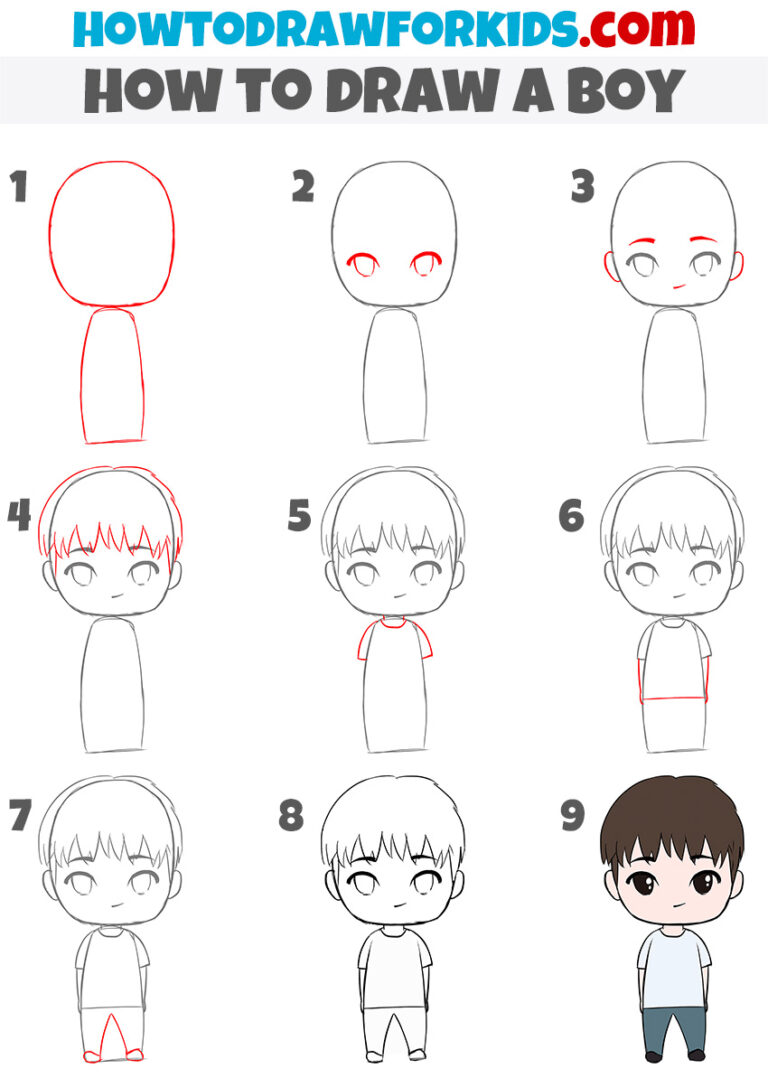
How To Draw A Boy In 8 Easy Steps For Kids - vrogue.co
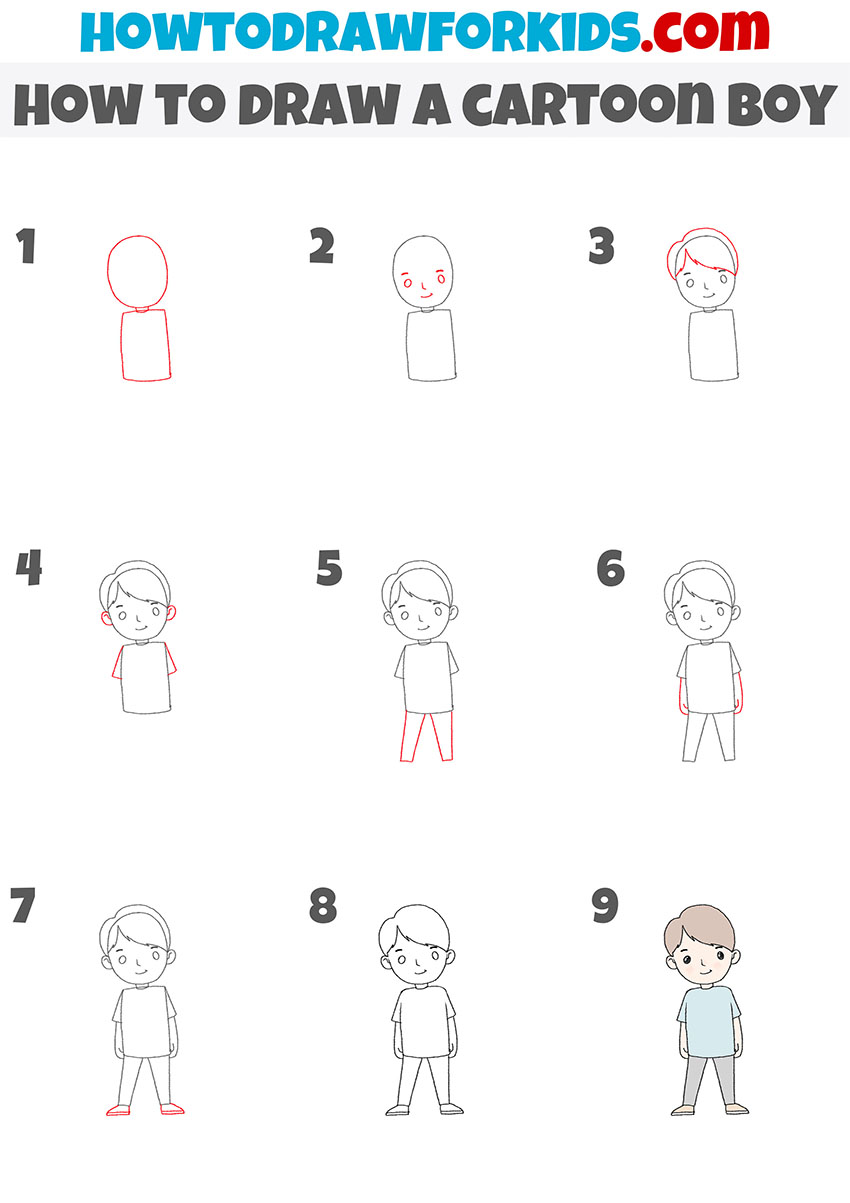
How to Draw a Cartoon Boy - Easy Drawing Tutorial For Kids
