KT Tape Side Of Foot: Simple Steps For Comfort And Support Today
Detail Author:
- Name : Dr. Luciano Wintheiser MD
- Username : layla.bergnaum
- Email : diamond03@gmail.com
- Birthdate : 1973-09-03
- Address : 3711 Stehr Ridges Lake Bernadine, OR 56846
- Phone : 1-820-348-3883
- Company : Armstrong PLC
- Job : Aerospace Engineer
- Bio : Quia veniam culpa cumque magnam mollitia beatae. Ea omnis dolorem sunt natus. Alias illum et aspernatur corporis tenetur id. Vel fugiat est minima eum.
Socials
instagram:
- url : https://instagram.com/connor2267
- username : connor2267
- bio : Dolores cupiditate qui ut. Aspernatur asperiores corrupti accusantium. Quod autem aut omnis.
- followers : 2004
- following : 1417
tiktok:
- url : https://tiktok.com/@connor_kunde
- username : connor_kunde
- bio : Aut provident impedit aliquam necessitatibus.
- followers : 3579
- following : 2659
Feeling a nagging ache along the side of your foot can, quite frankly, put a real damper on your day. It makes walking a chore, running a challenge, and just standing around a bit uncomfortable. You know, that feeling where every step reminds you something isn't quite right? It's a common issue, actually, and it can really mess with your ability to move freely.
For many, finding a simple way to ease this discomfort is a big deal. That's where something like KT tape, or kinesiology tape, comes into the picture. It's a flexible, gentle kind of tape, designed to give your foot some subtle backing without making it feel stiff or constrained. You see, it's about helping your body move more comfortably, not stopping it.
This article will show you how to use KT tape for that specific spot, the side of your foot. We'll talk about what might be causing your pain, how this tape works, and give you really clear steps for putting it on yourself. So, you can, you know, find a little more ease in your steps, perhaps even today.
Table of Contents
- Understanding Your Foot's Side: What's Going On?
- Getting Ready for KT Tape Application
- Step-by-Step Guide: KT Tape Side of Foot
- Beyond Application: Living with KT Tape
- Why KT Tape? The Gentle Support Option
- Frequently Asked Questions About KT Tape and Foot Pain
Understanding Your Foot's Side: What's Going On?
The side of your foot, whether it's the inner part or the outer edge, is a pretty complex area. It has many small bones, ligaments, and tendons that work together to help you stand, walk, and run. When something feels off here, it can, you know, really impact your whole stride.
Pain on the side of your foot isn't just one thing; it can come from various sources. Knowing a little bit about what might be causing your discomfort is, frankly, a good first step. It helps you think about how the tape might offer some relief, and, like, where exactly to place it.
Common Causes of Side Foot Pain
Many things can make the side of your foot hurt. For instance, if you feel pain on the outer edge, it could be related to your peroneal tendons, which run along the outside of your ankle and foot. These tendons can get, you know, a bit irritated from overuse or sudden movements, causing discomfort.
On the inner side, pain might stem from issues like fallen arches or even plantar fasciitis, which often causes pain in the heel but can sometimes spread. Stress fractures, though less common, are also a possibility, as are simple sprains or strains from a misstep. So, there are quite a few things it could be, actually.
How KT Tape Works: Its Gentle Approach
KT tape, or kinesiology tape, is somewhat different from traditional athletic tape. It's designed to stretch, similarly to your skin, which means it moves with you rather than restricting your movement. This flexibility is, you know, a pretty big part of its appeal.
When applied, the tape lifts your skin ever so slightly, creating a bit more space underneath. This tiny lift can help improve blood flow and reduce pressure on sensitive areas, which, in turn, might lessen discomfort. It's not about holding things rigidly in place, but rather about providing gentle support and, you know, encouraging your body's natural healing process. It's a subtle way to offer some backing.
Getting Ready for KT Tape Application
Before you start putting on the tape, a little preparation goes a long way. This makes sure the tape sticks well and stays on for as long as you need it to. It's, like, pretty important for getting the most out of your taping efforts.
Having everything ready beforehand also makes the whole process smoother. You don't want to be fumbling around for scissors once you've started applying the tape, for example. So, a quick check of your supplies is a good idea, you know, just to be sure.
What You'll Need to Get Started
You'll need a few basic things to tape your foot effectively. First, of course, you'll need the KT tape itself. It comes in rolls, and you'll cut pieces to the right length. A good pair of sharp scissors is, honestly, essential for clean cuts.
You might also want a clean towel and some rubbing alcohol or a mild soap. These are for making sure your skin is ready. Having a mirror handy can also be helpful, especially if you're trying to see an awkward angle on your foot, which can be a bit tricky.
Preparing Your Skin for the Best Stick
For the tape to stick properly and stay put, your skin needs to be clean and dry. Any lotions, oils, or even sweat can stop the adhesive from working its best. So, you know, a quick wash with soap and water is a good starting point.
After washing, make sure your skin is completely dry. You can use a towel, or just let it air dry for a bit. Some people like to use a little rubbing alcohol to remove any remaining oils, which, arguably, helps the tape adhere even better. Just make sure it's fully dry before you apply the tape, otherwise it just won't work as well.
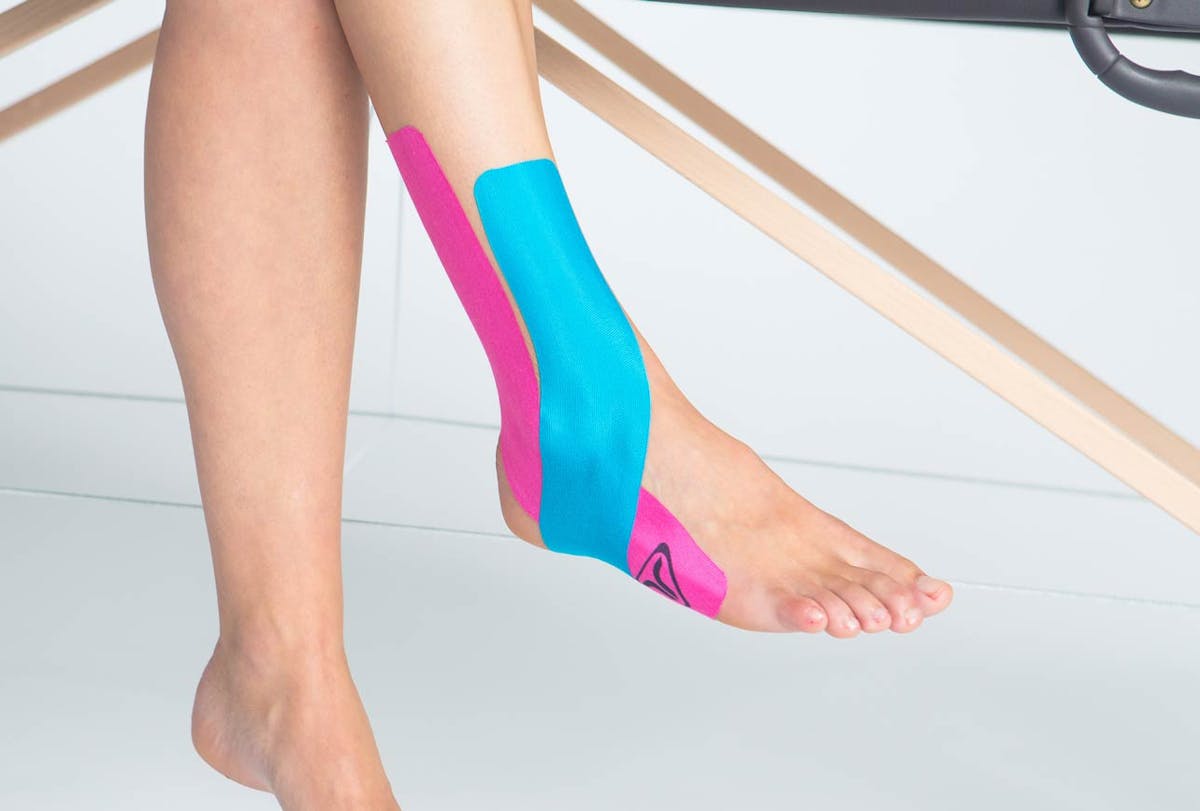
Step-by-Step Guide: KT Tape Side of Foot
Applying KT tape to the side of your foot depends a little on where your discomfort is. We'll cover two common areas: the inner side for arch support or inner foot pain, and the outer side for ankle stability or outer foot discomfort. Remember, these are general guides, and you might need to adjust them slightly for your own foot, you know.
The key is to apply the tape with the right amount of stretch. Too much, and it can irritate your skin; too little, and it won't provide the support you want. So, practice a bit, and you'll get the feel for it, pretty much.
For Arch Support and Inner Foot Pain
If your pain is on the inner side, perhaps related to your arch, this method can offer some relief. First, measure a piece of tape long enough to go from the ball of your foot, under your arch, and up the inner side of your ankle. You might need, like, about 10-12 inches.
- Cut the tape with rounded corners; this helps stop it from peeling up too quickly.
- Sit with your foot relaxed, maybe slightly pointed away from you.
- Tear the paper backing about two inches from one end to create an "anchor."
- Apply this anchor to the ball of your foot, just behind your toes, without any stretch.
- Gently peel the rest of the backing as you bring the tape under your arch. Apply this section with a moderate stretch (about 50-75%) as you pull it up along the inner side of your foot, following the curve of your arch.
- Finish by applying the last two inches of tape up your inner ankle, again, with no stretch. Rub the tape gently to activate the adhesive, which is, you know, really important for it to stick.
This method, in a way, aims to give your arch a bit of a lift and support, which can lessen strain on the inner foot. It's a rather common way to use this tape for that kind of discomfort.
For Outer Foot Pain and Ankle Stability
For discomfort on the outer edge of your foot or if you need a bit more ankle stability, a different application works well. Measure a piece of tape long enough to go from the base of your little toe, along the outer side of your foot, around your heel, and up the inner side of your ankle. This will likely be, like, 12-15 inches.
- Again, round the corners of your tape strip.
- Sit with your foot in a neutral position, or slightly flexed up.
- Create an anchor by tearing the backing two inches from one end.
- Apply this anchor to the base of your little toe, on the top of your foot, without any stretch.
- Peel the backing and bring the tape along the outer edge of your foot, applying with a moderate stretch (about 50%). Follow the curve of your foot.
- Continue wrapping the tape around your heel, maintaining that moderate stretch.
- Bring the tape up the inner side of your ankle, applying the last two inches without stretch. Rub the tape firmly to ensure it adheres well, which, you know, really helps it stay on during activity.
This application aims to support the tendons and ligaments on the outer side of your foot and around your ankle. It's, like, a common way to help with things like peroneal tendon issues or a feeling of ankle weakness.
General Tips for Best Results with KT Tape
No matter where you're taping, a few general tips can really make a difference. Always apply tape to clean, dry skin. This is, honestly, the most important step for good adhesion. Make sure you don't overstretch the tape, especially at the ends, as this can cause skin irritation or blistering.
After applying, rub the tape vigorously for several seconds. This friction helps activate the adhesive, making it stick better and last longer. You know, it's a small step that makes a big difference. Also, avoid showering or heavy sweating for about an hour after applying, to give the adhesive time to fully bond. And, you know, try to avoid putting the tape over any open wounds or irritated skin, obviously.
Beyond Application: Living with KT Tape
Once your KT tape is on, you'll probably want to know how long it can stay there and how to take care of it. It's pretty durable, but there are some things you can do to make it last and keep your skin happy. This part is, you know, just as important as the application itself.
Knowing when to remove it and what to do if you experience any issues is also key. It's about, like, being smart with your self-care. So, let's talk about those next steps, shall we?
How Long to Wear It for Comfort
KT tape is designed to be worn for several days, typically anywhere from three to five days. It's waterproof, so you can shower with it on, which is, you know, really convenient. The exact duration depends on how active you are and how well the tape stays stuck.
If the edges start to peel up significantly, or if you notice any skin irritation, it's probably time to remove it. You know, listening to your body is always the best guide. Some people find it lasts longer than others, so it's a bit of a personal thing, actually.
Care and Removal: Keeping Your Skin Happy
When showering with the tape on, just pat it dry gently afterward; don't rub it. If it gets really wet, you can use a hairdryer on a low, cool setting to help it dry faster. This, in a way, helps preserve the adhesive.
To remove the tape, it's best to do it slowly and gently. You can peel it off in the shower, as the water helps loosen the adhesive. Peel it back in the direction of hair growth, pressing down on your skin just behind the tape as you go. This helps reduce pulling on your skin, which, you know, can be uncomfortable. If you have sensitive skin, applying a little oil (like baby oil or olive oil) to the tape beforehand can help loosen it even more, which is, like, a pretty good trick.
When to Seek Professional Help for Foot Discomfort
While KT tape can offer great support for many minor aches and pains, it's not a substitute for professional medical advice. If your pain is severe, gets worse, or doesn't improve after a few days of taping, it's really important to see a doctor or a physical therapist. They can, you know, properly diagnose what's going on.
Also, if you experience any numbness, tingling, or changes in skin color, seek medical attention right away. These could be signs of something more serious that needs a professional look. KT tape is a helpful tool, but it's just one piece of the puzzle, you know.
Why KT Tape? The Gentle Support Option
Choosing KT tape for foot discomfort, particularly on the side of your foot, comes with several advantages. It's a non-invasive way to offer support, which means no pills or injections. For many, this is a big plus. It's also, you know, pretty easy to get your hands on and learn to use.
The gentle nature of the tape allows for full range of motion, unlike some other types of bracing. This means you can keep doing your usual activities, or at least modified versions, while still getting some backing. It's about feeling supported, but not restricted, which, arguably, is a very good balance.
Benefits You Might Notice with KT Tape
People often report several benefits when using KT tape for foot pain. You might find a reduction in discomfort, making it easier to walk or stand for longer periods. The tape can also help with swelling, as that slight lift of the skin can, you know, encourage fluid movement.
For those needing a bit of stability, especially around the ankle or arch, the tape provides a subtle sense of security. It's not a rigid brace, but it reminds your body to move in a more supported way. So, you could feel more confident in your steps, which is, like, a pretty nice feeling.
Many athletes and active individuals use it to help with recovery after strenuous activity, or to provide ongoing support during training. It's, you know, a versatile tool for many different situations. Learn more about kinesiology taping techniques on our site, for instance.
A Personal Touch and Broader Support
You know, sometimes, giving your body a little support is like building a strong foundation. It's a bit like how some communities aim to share important ideas, spreading them widely, like our forum's desire to share wisdom with everyone. We believe in helping people find their footing, whether that's through spiritual guidance or, in this case, practical tips for physical well-being. This gentle tape, in a way, helps build that sort of support for your foot, allowing you to keep moving forward, much like strong beliefs help us move through life. It's about finding ways to support the whole self, actually.
Using KT tape for the side of your foot is a simple, effective way to offer yourself some comfort and support. It's a tool that helps you stay active and manage minor aches, allowing you to keep moving with more ease. Remember, for more in-depth information on specific conditions, you can always visit our health resources page.
For more general information on kinesiology tape and its uses, you might find this resource helpful: National Center for Biotechnology Information (NCBI) - Kinesiology Taping. This external link provides a scientific perspective on the tape's effects, which, you know, can be pretty interesting to read about.
Frequently Asked Questions About KT Tape and Foot Pain
Here are some common questions people often ask about using KT tape for foot discomfort, especially on the side of the foot. These questions, you know, come up quite a bit.
Can KT tape help with foot pain?
Yes, KT tape can often help with various types of foot pain, including discomfort on the side of the foot. It provides gentle support, helps reduce swelling, and can, you know, improve circulation. Many people find it offers relief for issues like arch strain or outer foot soreness, which is pretty good.
How long can you wear KT tape on your foot?
Typically, you can wear KT tape on your foot for about three to five days. It's designed to be durable and waterproof, so you can shower with it on. However, if it starts to peel or if your skin feels irritated, it's best to remove it sooner, you know, just to be safe.
What does KT tape do for the foot?
KT tape works by gently lifting the skin, which can reduce pressure on sensitive areas and potentially improve blood flow. For the foot, this means it can offer support to muscles and tendons, help with pain relief, and sometimes, you know, lessen swelling. It's not a rigid brace, but rather a flexible support that moves with your foot.

Kt Tape Foot Plantar Fasciitis UK Stockists | www.pinnaxis.com
How KT Tape Can Help You Heal (in More Ways Than One), 52% OFF
KT Tape - 360 Athletics
